Introduction
This article presents a quick and dirty tutorial to get you up and running and creating applications for Windows CE with Visual C++. If your interested in the basics of Windows CE, see the article titled Microsoft Windows CE: An Overview. This article will focus on Visual C++ for Windows CE. It assumes that you are familiar with Microsoft Visual C++, the leading C++ development tool for the Microsoft Windows platform.
The Basics
If you have been using Visual C++ to create Win32 applications or components (using Active Template Library (ATL), Microsoft Foundation Classes (MFC), or the Win32 API), then creating applications or components for Windows CE will not be that great of a challenge for you. Applications for Windows CE need to be light and fast. The reason for this is to meet the needs of the small portable or embedded devices that Windows CE runs on. As mentioned in the article Microsoft Windows CE: An Overview there are basically three types of devices that Windows CE runs on:
- The Handheld PC – handheld devices supporting a display size of 640 x 240 pixels, touch screen with a small keyboard, optional sound, and a CompactFlash and/or a PCMCIA slot
- The Palm PC – palm-sized devices supporting a display size of 240 x 320 pixels, no keyboard or mouse, optional sound, and a CompactFlash slot
- The Auto PC – in-car system supporting voice activation, wireless communications, and a built-in navigation system.
As you can see, the very nature of these devices dictates that applications that run on them use little screen real-estate, have a small code and memory footprint, and be fast. Fortunately for developers, Microsoft built Windows CE with a scaled-down version of the Win32 API. This means that most applications can be written just as you would any other Win32 application or component. You can even use MFC and ATL. There is one catch. Not all the features available in the Win32 API, ATL, and MFC are available on Windows CE. Most of the function calls are exactly the same. Some things such as the C Runtime Libraries sport a subset of the normal functions supported. However, some things such as the Standard Template Library are simply not available. In keeping with the superior support that Microsoft tools provide for developers, Visual C++ for Windows CE has a whole host of wizards, sample applications, and books on line to help you the developer create applications and components for Windows CE.
Visual C++ for Windows CE
Visual C++ for Windows CE is simply an add-on to Visual C++ and the Developer Studio that you are already familiar with. The Integrated Development Environment (IDE) is exactly the same, you just need to understand the specifics of your target environment, Windows CE, and the new wizards. When you install Visual C++ for Windows CE, you will have the following Windows CE specific tools and features added to Visual C++:
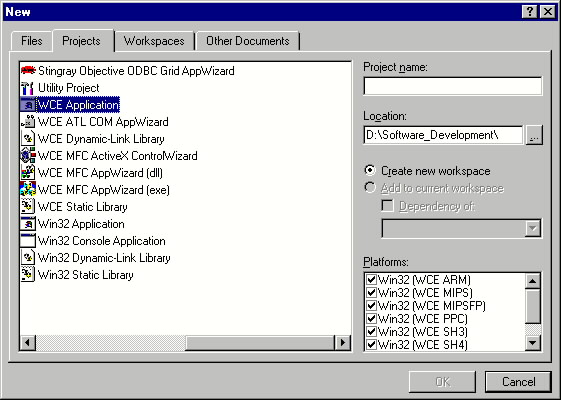
- New Windows CE Wizards (see Figure 1)
- Windows CE Supported Processor Targets
- Windows CE version of MFC
- Windows CE version of ATL
- Windows CE Emulation Environment
- Tools to remotely execute and debug Windows CE Applications
The Wizards
The new Wizards installed by Visual C++ for Windows CE are valuable tools in your quest to create applications and components for Windows CE. There are four new Wizards added with VC++ for Windows CE (see Figure 1). They are almost identical to the normal AppWizards found in Visual C++ except that they take advantage of Windows CE-specific features. They can help you generate a basic application, dynamic link library (DLL), or component application shell quickly. The new application wizards are as follows:
- WCE Application
- WCE Dynamic-Link Library
- WCE ATL COM AppWizard
- WCE MFC ActiveX ControlWizard
- WCE MFC AppWizard (DLL)
- WCE MFC AppWizard (EXE)
- WCE Static Library
As Windows CE becomes even more popular, I am sure that VC++ for Windows CE will have even more wizards to aid you in developing applications and components for Windows CE.
Your First Visual C++ for Windows CE Application
Your first Visual C++ for Windows CE application will be a simple application, a WCE MFC AppWizard (EXE) to be precise. This application will have a single view that will have a bitmap painted on it. We will also add a menu item that when clicked will evoke a dialog. This dialog will contain one of the Windows Common Controls, a progress control.
Creating the Basic Application
To start your first Windows CE application we will generate a shell using the WCE MFC AppWizard. The numbered list below will step you trough this process:
1. Open Visual C++ and go to the File menu and choose the New item
2. Select the Projects property tab if it is not already selected.
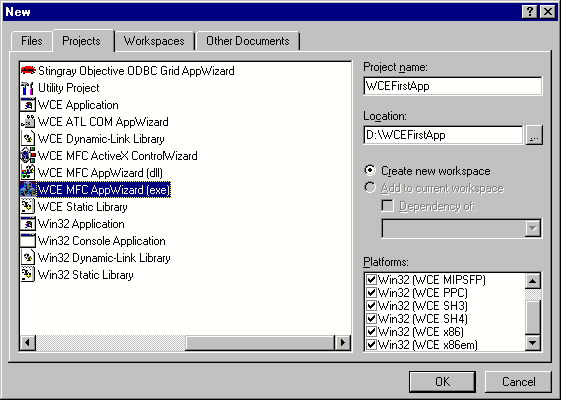
3. Select WCE MFC AppWizard (exe) in the list control.
4. Type WCEFirstApp in the Project name edit box
When you finish, you will see the New dialog box as seen in Figure 3.
5. Press the Next button.
WCE MFC AppWizard (exe) – Step 1 of 4 will appear as seen in Figure 4. Notice that the selections are similar to the MFC AppWizard except that there is no Multiple documents selection.
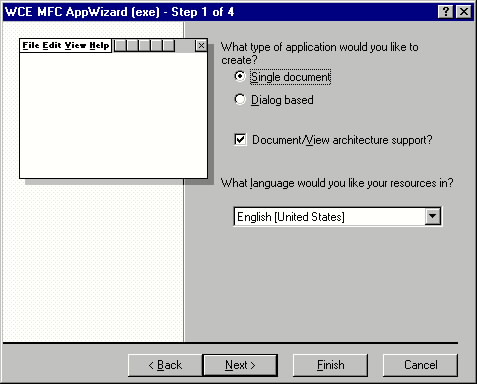
6. Accept the defaults.
7. Press the Next button.
WCE MFC AppWizard (exe) – Step 2 of 4 will appear as seen in Figure 5. There are several options on this page. You can add support for Windows Sockets, ActiveX Controls, Windows Help, and Printing if your target supports Windows CE 2.1. You also can choose the type of command bar that you wish to support. For this exercise we will accept the defaults.

8. Accept the defaults.
9. Press the Next button.
WCE MFC AppWizard (exe) – Step 3 of 4 will appear as seen in Figure 6. You can choose to include generated comments, an option that I highly recommend. There is no such thing as too much documentation. There is also an option to link dynamically or statically with the MFC Library. Accept the defaults.
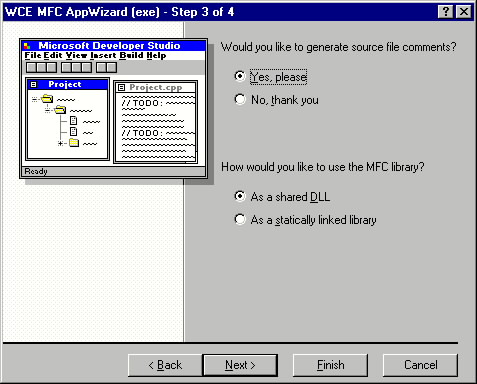
10. Accept the defaults.
11. Press the Next button.
WCE MFC AppWizard (exe) – Step 4 of 4 will appear as seen in Figure 7. This page gives you an opportunity to set the base class for the view. It also gives you an opportunity to set your file names. Accept the defaults.

12. Accept the defaults.
13. Press the Finish button.
The New Project Information dialog will appear as seen in Figure 8. Just like all Visual Studio AppWizards the wizards give you a final chance to look over your choices.

14. Press the Ok Button.
15. Select Build menu and choose the Rebuild All item.
When the application is completed building, you are ready to go on to the next section.
The View
Now that we have a basic application, let’s work to draw a bitmap in the client area of the view of our application. First lets import a bitmap resource into the application and call it IDB_WINCE_BITMAP. A bitmap is available with the source code for this application that you can download from this site: Download Zipped Source Code for this Tutorial. The bitmap is in the \WCEFirstApp\res\ directory and is titled wince.bmp.
Once you have imported the bitmap, use ClassWizard to add a handler for the WM_ERASEBACKGROUND message. Then in the function stub for the WM_ERASEBACKGROUND message insert the following code: BOOL CWCEFirstAppView::OnEraseBkgnd(CDC* pDC) { /////////////////////////////////////////////////////////////////////////// // Define Our Variables // /////////////////////////////////////////////////////////////////////////// CBitmap bmp, *poldbmp; BITMAP bmpStruct; CDC memdc; CRect bmpRect, clientRect; /////////////////////////////////////////////////////////////////////////// // Let’s Paint the Background Black for a Nice Contrast with the Bitmap // /////////////////////////////////////////////////////////////////////////// // Set brush to desired background color CBrush backBrush(RGB(0,0,0)); // Save old brush CBrush* pOldBrush = pDC->SelectObject(&backBrush;); // Get the Size of the CLient Area GetClientRect(&clientRect;); // Fill the Client Area Using our new Brush pDC->FillRect(&clientRect;, &backBrush;); /////////////////////////////////////////////////////////////////////////// // Now Lets Blit the Bitmap // /////////////////////////////////////////////////////////////////////////// // Load the bitmap resource bmp.LoadBitmap(IDB_WINCE_BITMAP); bmp.GetBitmap(&bmpStruct;); // Figure out the Coordinates to Center the Bitmap bmpRect.left = clientRect.left + (clientRect.Width() – bmpStruct.bmWidth)/2; bmpRect.top = clientRect.top + (clientRect.Height() – bmpStruct.bmHeight)/2; bmpRect.right = clientRect.right – (clientRect.Width() – bmpStruct.bmWidth)/2; bmpRect.bottom = clientRect.bottom – (clientRect.Height() – bmpStruct.bmHeight)/2; // Create a compatible memory DC memdc.CreateCompatibleDC(pDC); // Select the bitmap into the DC poldbmp = memdc.SelectObject( &bmp; ); // Copy (BitBlt) bitmap from memory DC to screen DC pDC->BitBlt(bmpRect.left, bmpRect.top, bmpRect.right, bmpRect.bottom, &memdc;, 0, 0, SRCCOPY); // Restore the DC to it’s Original State memdc.SelectObject(poldbmp); pDC->SelectObject(pOldBrush); return TRUE; }
This is the source code necessary to set the background of the client area to black and then Blit our bitmap into the center of the screen. Next we will create and add our menu item and dialog.
The Dialog Box
Now create a dialog box with the Win32 Common Control, the Progress Control. But first lets start by adding a menu item and a message handler to evoke our dialog. The numerical steps below will guide you through it.1. Go to the IDR_MAINFRAME menu resource and add a new popup menu and call it Tools.
2. Under the Tools popup add a menu item and call it Run WCE First Dialog.
3. Using ClassWizard add a command handler for the newly created Run WCE First Dialog menu item.
We now need to add a dialog, place the controls, and bind the dialog resource to a class.4. Insert a new dialog resource and set the caption to WCE First Dialog and the resource identifier to IDD_FIRST_DLG.
5. Change the Ok button caption to Close.
6. Change the Cancel button to Start and change the resource identifier to IDB_START_BTN.
7. Drag a Progress Control from the Control Palette and place it on the dialog. Accept the default entries for styles, caption and resource ids.
8. Arrange your dialog keeping in mind the screen size on a palm top computer. 196 x 47 should suffice for the size of your dialog.
9. Using ClassWizard bind the dialog resource to a new class call it CWCEFirstDialog.
10. Once you have the dialog class, use ClassWizard to add a member variable for the progress control. Call the member variable m_progressCtrl.
11. Add a command button handler for the Start button.
You now have all the prerequisites set up to add in your code. The progress indicator and dialog that we have created are not very practical, but serve the purposes of this short tutorial well. When the dialog box is evoked from the Run WCE First Dialog menu item, the user will see the dialog. When the Start button is pushed, the progress control will step from 0 to 30000 and upon completion display a standard Windows Message Box. Pressing Close will dismiss the dialog.
To set up the progress indicator you must set the range and step in the dialog’s WM_INITDIALOG message handler. Using ClassWizard, add a message handler for the windows message WM_INITDIALOG. In the OnInitDialog() function add the code to set the step and range of the progress indicator as shown in the following code fragment: BOOL CWCEFirstDialog::OnInitDialog() { CDialog::OnInitDialog(); m_progressCtrl.SetRange(0,30000); m_progressCtrl.SetStep(1); return TRUE; // return TRUE unless you set the focus to a control // EXCEPTION: OCX Property Pages should return FALSE }
Next you need to increment the progress control once the user presses the Start button. Once the progress indicator finishes, a message box needs to be displayed. The following code demonstrates how to accomplish this: void CWCEFirstDialog::OnStartBtn() { for(int i = 0; i <=30000; i++) { m_progressCtrl.StepIt(); } AfxMessageBox(_T(“Progress Complete!!!”), MB_OK); }
Wrapping It All Up
You are now ready to build and test your application. Set the Active Configuration to Win32 (WCE x86em) Debug. Select Build menu and choose the Rebuild All item. Once the application is done building Visual C++ will take care of copying the executable to the emulator and evoke the emulator. Be patient, it takes a minute or so to load. You should see the Windows CE Emulator.
Select the My Handheld PC icon and you will then see the Windows CE Explorer as shown in Figure 9.

The icon for the WCEFirstApp should be there in the window. Double click the icon and the WCEFirstApp will load and appear as in Figure 10.
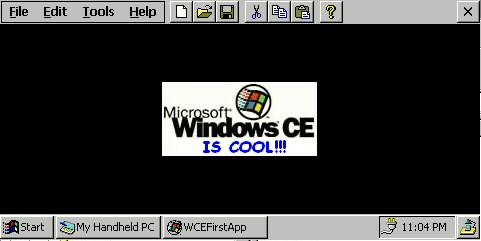
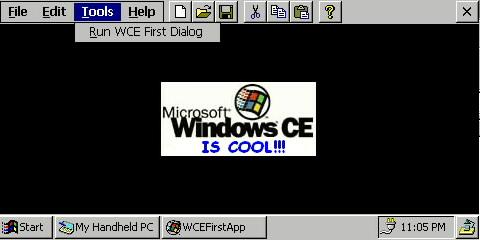
You should now see the bitmap you told the application to draw on a black background. Go to the Tools popup menu and select the Run WCE First Dialog menu item as shown in Figure 11.
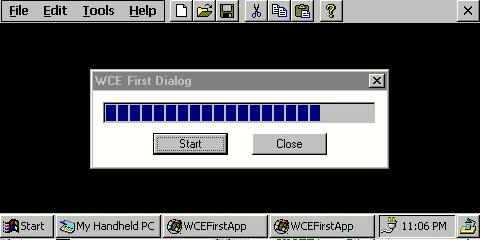
The WCE First Dialog should display. Press the start button and watch, as seen in Figure 12, the progress indicator increment the progress.
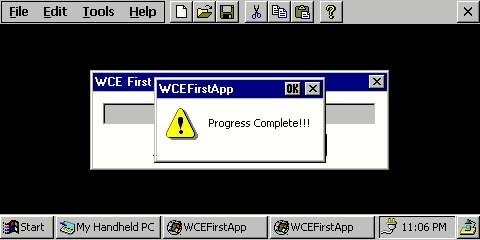
When the progress indicator is finished, a message box will appear as shown in Figure 13.
Code Complete
Congratulations! You have just completed your First Windows CE Application. As you can see, creating applications for Windows CE using Visual C++ is just as easy as creating applications for Win32 using Visual C++. Most of the things are done exactly the same. Hopefully, this tutorial has given you a gentle introduction. I encourage you to continue learning about Windows CE by exploring the other areas here in the Wireless Developer Network. In the next section, examine the other resources that are available to increase your knowledge about Windows CE and handheld computing in general.